Mastering Woodworking Planers: A Comprehensive Guide
Unlocking the Secrets to Using Woodworking Planers: An In-Depth Guide
Before diving into the world of woodworking planers, it’s important to ensure you have the essential tools and take necessary safety measures. Having the right equipment and prioritizing safety will not only make your woodworking experience more enjoyable but also prevent accidents and injuries.
1. Essential Tools
First and foremost, you’ll need a quality woodworking planer. Look for one that suits your needs, whether it’s a handheld planer for small projects or a larger thickness planer for more substantial pieces. Additionally, stock up on extra planer blades to ensure smooth operation and avoid any interruptions during your work. Other essential tools include a sturdy workbench, clamps, measuring tools, and sharpening equipment for maintaining your blades.
2. Safety Measures
Woodworking involves sharp tools and potentially hazardous materials, so always prioritize safety. Start by wearing appropriate protective gear, such as safety goggles, ear defenders, and a dust mask. Keep your work area well lit and free of clutter to minimize the risk of accidents. When using the planer, ensure the material you’re working with is secured in place and never force the tool beyond its capabilities. Lastly, regularly inspect and maintain your tools to ensure their safety and optimal functionality.
3. Preparation and Safety Checks
Prior to using a woodworking planer, it’s crucial to prepare your workpiece adequately. Remove any nails, staples, or other metal objects that could damage the planer blades or cause kickback. Always run your fingers across the wood surface to detect any hidden defects or irregularities. Additionally, measure the thickness of your stock accurately before adjusting the planer settings. Taking these precautionary steps will help you achieve better results and prevent potential accidents while planing.
By equipping yourself with the essential tools and observing safety measures, you’re on your way to mastering woodworking planers. Remember, investing time in proper preparation and safety will pay off in the quality of your work and the protection of your well-being. Now that you’re armed with the necessary knowledge, it’s time to unleash your creativity and embark on your woodworking adventure!
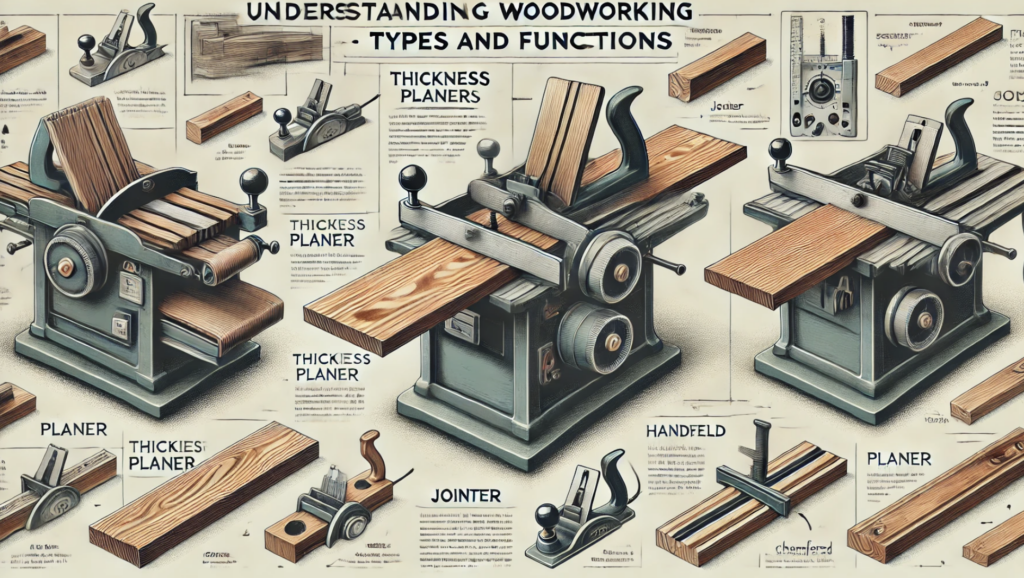
Understanding Woodworking Planers: Types and Functions
Woodworking planers are essential tools for any woodworking project, helping to shape and smooth the surface of wood. Whether you are a beginner or a seasoned woodworker, having a good grasp of the different types of planers and their functions is crucial. In this guide, we will explore the various types of planers commonly used in woodworking and their specific purposes.
The most common type of planer is the thickness planer, which is used to level out and reduce the thickness of a piece of wood. It features a set of rotating blades that remove excess material, resulting in a smooth and even surface. Thickness planers are particularly useful when you need to create boards of consistent thickness for a specific project, such as making table legs or cabinet doors.
Another type of planer is the jointer, which is designed to flatten and straighten the face or edges of a board. Jointers are equipped with a fence and a rotating cutter head, which removes any imperfections or irregularities on the surface of the wood. This tool is essential for ensuring the wood planks are perfectly flat and square, making it ideal for joinery work or when creating panels for furniture.
There are also handheld planers that are smaller and more portable compared to their larger counterparts. These planers are ideal for fine woodworking projects, as they allow for more precise control when shaping or smoothing smaller pieces of wood. Handheld planers are commonly used for tasks such as removing chamfers, beveling edges, or even trimming doors to fit properly.
Understanding the different types of planers and their functions is crucial for achieving professional results in your woodworking projects. With the right planer in your arsenal and a good understanding of how to use it, you will be able to achieve smooth and accurate finishes on your woodwork. Experiment with different planers and techniques to find the best combination that suits your woodworking needs.
Tips and Techniques for Perfecting Wood Surfaces
When it comes to woodworking planers, achieving smooth and flawless wood surfaces requires the right techniques and attention to detail. Here are some valuable tips to help you master the art of planing wood:
1. Choose the Right Type of Wood: Not all wood is created equal, and choosing the right type for your project can make a significant difference. Dense and straight-grained woods like maple and cherry are often preferred for their smoothness and ease of planing. Avoid using woods with knots or excessive grain patterns, as they can cause tear-out and uneven planing results.
2. Proper Blade Maintenance: A sharp and well-maintained blade is essential for achieving smooth wood surfaces. Regularly inspect your planer’s blade and replace or sharpen it as needed. Ensure that the blade is properly installed and securely tightened to prevent any wobbling during the planing process.
3. Mind the Grain Direction: Always pay attention to the direction of the wood grain when planing. Planing against the grain can lead to tear-out and rough surfaces. To get the best results, follow the grain direction and adjust your planing technique accordingly. Remember, going with the grain produces smoother cuts and helps achieve a flawless finish.
Troubleshooting and Maintaining Your Planer for Longevity

Regular Cleaning and Lubrication
To ensure the long-lasting performance of your woodworking planer, it is vital to keep it clean and well-lubricated. After each use, be sure to remove any wood chips, dust, or debris from the surface and the cutterhead. For cleaning, use a brush or air compressor to carefully remove all the particles. Additionally, make sure to lubricate all the moving parts of the planer, such as the feed rollers, cutterhead, and chain drive, using an appropriate lubricant recommended by the manufacturer. Regular cleaning and lubrication will minimize friction and ensure smooth functioning, thereby extending the lifespan of your planer.
Checking and Adjusting Blades
To achieve precise cutting results, it is crucial to routinely check and maintain the condition of the blades in your planer. Blunt or damaged blades can not only impact the quality of your work but may also strain the motor and decrease the efficiency of the planer. Regularly inspect the blades for any nicks, chips, or signs of wear and tear. If necessary, replace the blades or have them professionally sharpened to maintain optimal performance. Additionally, ensure that the blades are properly aligned and set to the correct cutting depth according to the manufacturer’s instructions.
Maintaining the Feed Rollers and Conveyor Belt
The feed rollers and conveyor belt are integral components of a planer that require regular inspection and maintenance. Over time, these parts can become dirty or worn out, leading to feeding issues and inaccurate thicknesses. Check the feed rollers for any debris or buildup that could affect their grip on the wood. Clean them with a mild solvent if necessary. Similarly, examine the conveyor belt for any signs of wear, tears, or slackness. If needed, adjust or replace the belt as per the manufacturer’s guidelines. Proper care and maintenance of the feed rollers and conveyor belt will contribute to the smooth feeding and consistent planing results.
Monitoring Motor and Belt Tension
The motor and belt play a crucial role in powering the planer and ensuring its smooth operation. Regularly inspect the motor for any unusual noises, excessive heat, or vibration. If you notice any abnormalities, it is advisable to consult a professional for inspection or repairs. Additionally, check the tension of the drive belt that connects the motor to the cutterhead. An improperly tensioned belt can hinder the performance of the planer. Follow the manufacturer’s instructions to properly adjust the belt tension, ensuring it is neither too loose nor too tight. By monitoring the motor and belt tension, you can prevent any potential damage and prolong the lifespan of your planer.


